 RSS Feed
 Twitter
2- Search for "Boot Camp Assistant" in your finder and then double-click it. If Boot Camp doesn't appear in your finder, you will have to download it from Apple's website.

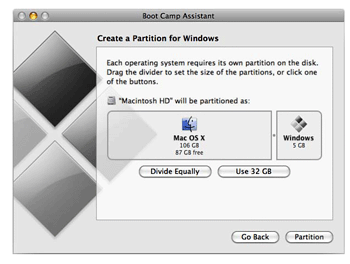
3- You will have to choose how much disk space you will put in your Windows partition ( 32GB is recommended or you can divided equally) and then click partition.
4- Insert your Windows installation disc into your computer and the installation will begin.
5- Once the installation is finished, Windows will ask you a few questions like always (User, Password, Keyboard settings, etc...)
6- After you have installed Windows you will need to install all your drivers in windows because you will note that you don't have any sound and you can't even eject a Disc. To do this you have to take your computer's original disc that came with the box and take the "Mac OS X install DVD"
7- You will also notice that your Mac will always boot as Windows once the installation finished, but you can change this setting directly in windows from your taskbar. Right-click on your Boot Camp icon in your taskbar and click "Restart in Mac OS X". You can also change this setting in your Boot Camp Control Panel.

You can now access to Mac OS X and Windows on the same computer. If you want to choose between Mac OS X and Windows at startup you need to press the "Alt" button for about 5 seconds and this screen will appear.

If you have any questions, just leave a comment here or in the Facebook fan page
0 comments:
Post a Comment